User guide for Camac
Version: v1.2.0
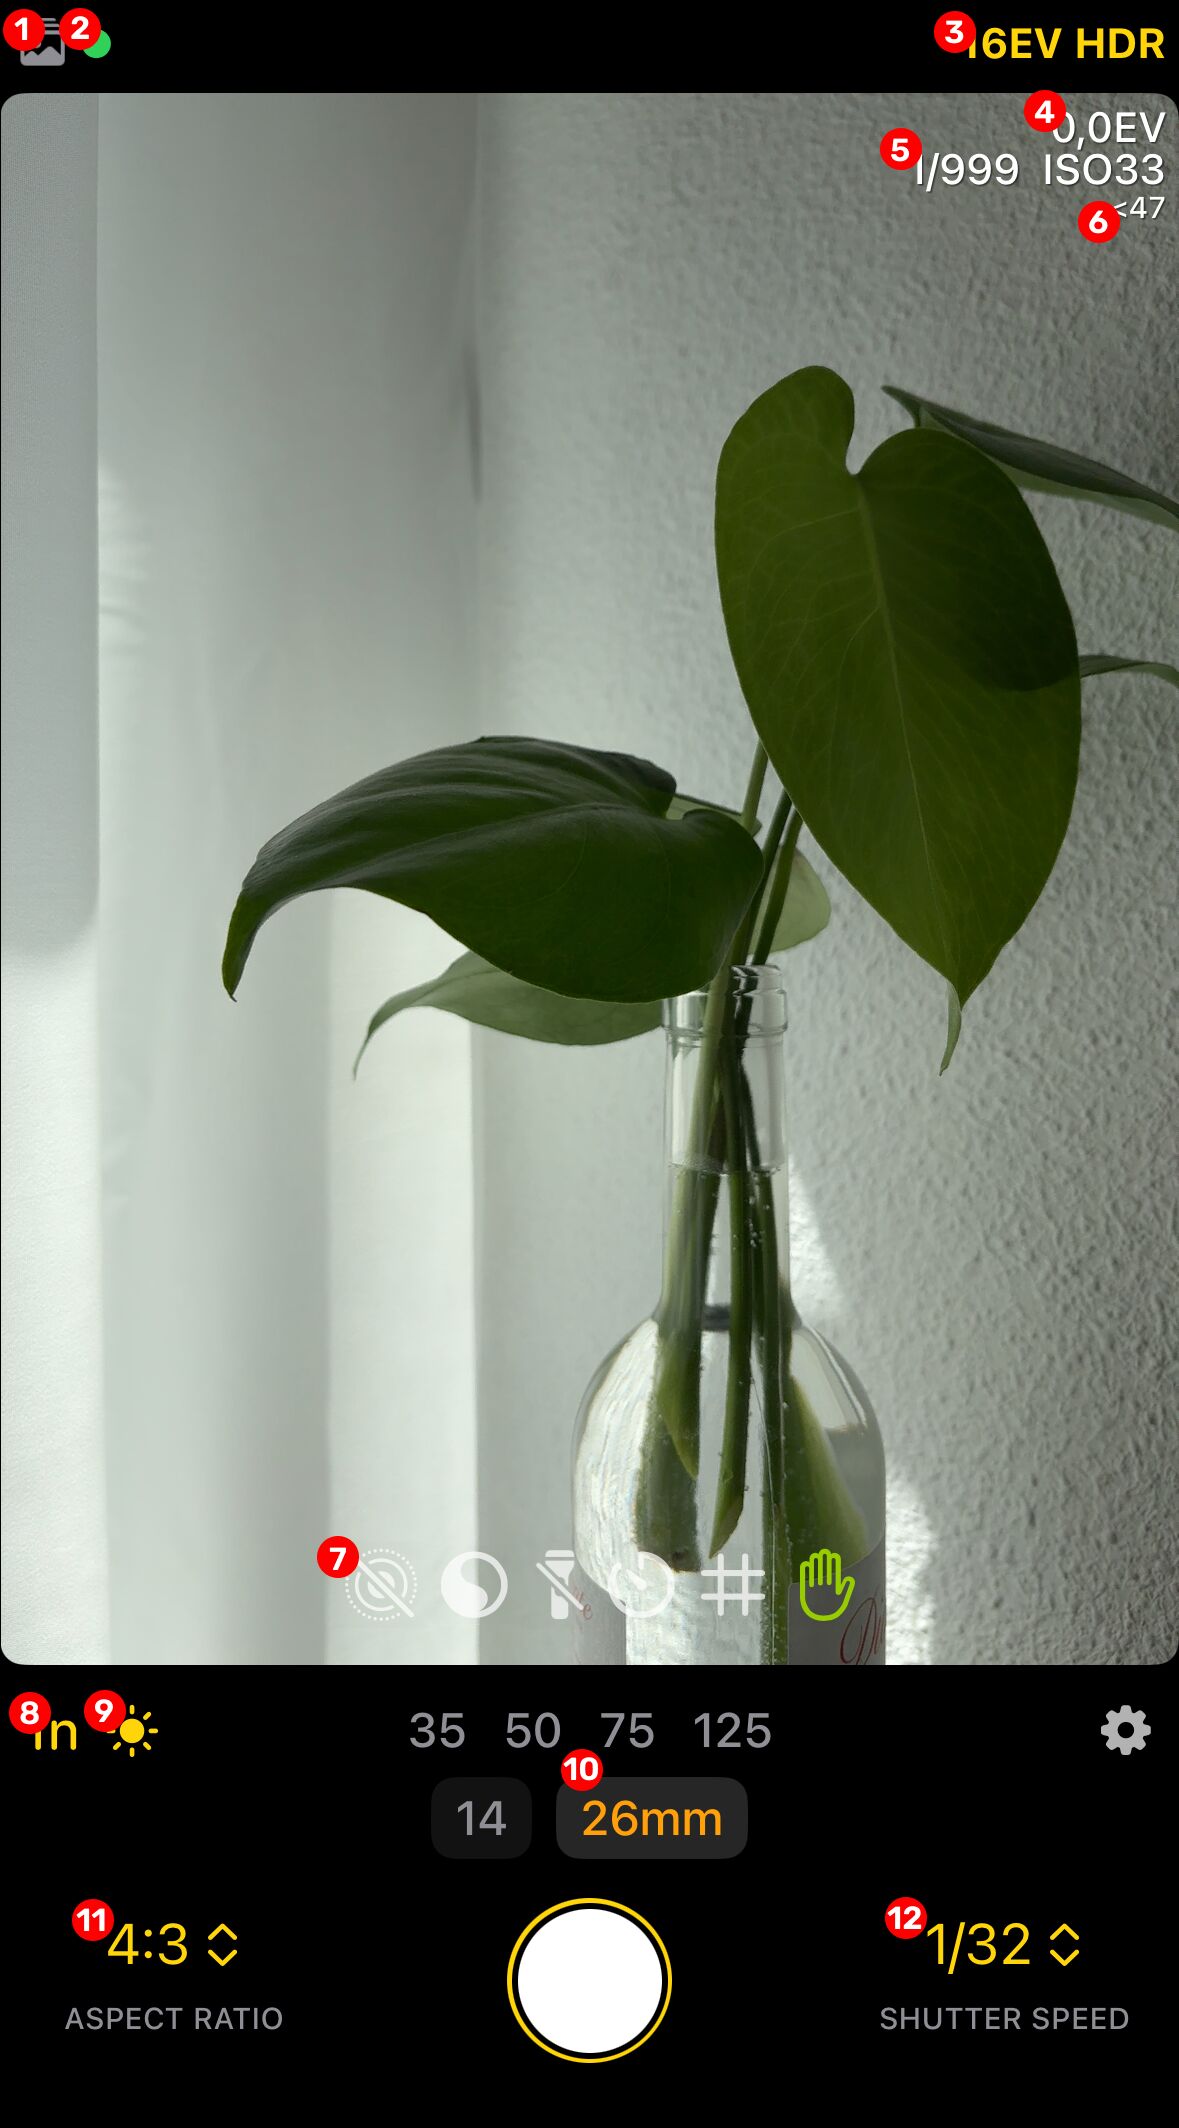
Main interface
-
Save to: This icon indicates the current save destination for your DNG files. Tap it to switch between saving to the Photos library or the Files app, which corresponds to the "Save to" setting.
-
HDR Indicator: When you take HDR photos, this indicator appears as the image is saved, showing the quality of the merge.
- Green dot: A successful merge.
- Yellow dot: A limited merge due to minor ghosting. The dynamic range is still greater than 12EV.
- Yellow triangle: The image was automatically degraded to a single exposure due to heavy ghosting.
- DR Mode: Displays the current Dynamic Range (DR) mode:
- 16EV HDR: The app is in 16EV HDR mode.
- 12EV DR: The app is in 12EV DR mode.
- 12EV DR+: The app is in the enhanced 12EV DR mode.
-
Exposure bias: Displays the current exposure bias. Swipe up or down on the viewfinder to adjust it. Tap the indicator to reset the exposure bias to zero.
-
Shutter Speed and ISO: This displays the estimated shutter speed and ISO for the next shot.
-
ISO in Auto: The value below the ISO indicates the default ISO in auto mode for the same scene.
- <ISO: The current ISO is lower than what the default ISO.
- =ISO: The current ISO is the same as what the default ISO.
- >ISO: The current ISO is higher than what the default ISO.
- Toolbar
- Live Photo: Toggle Live Photos on or off.
- B&W Preview: Toggle a black and white preview in the viewfinder.
- Flashlight: Toggle the flashlight on or off.
- Timer: Toggle the timer mode.
- Grid: Toggle composition grid lines.
- Stable Capture: Toggle the stable capture mode.
-
fn button: Toggles the visibility of the toolbar.
-
DR switch button: Switches between 16EV HDR and 12EV DR modes.
-
Focal length selector: Select the desired focal length.
-
Aspect Ratio selector: Sets a framing guide for your chosen aspect ratio for the DNG. The full 4:3 sensor data is always saved to the DNG file. You can recover the full, uncropped photo by sharing the DNG file back to the Camac App.
-
Shutter Speed limiter: This is not a manual shutter speed control. Instead, it acts as a limiter, prioritizing the fastest possible shutter speed up to your selected value while maintaining a correct exposure.
Settings
16EV HDR
In this mode, Camac merges multiple exposures (brackets) to create a 16-bit DNG file with up to 16EV of dynamic range.
Shadow boost
Enhances shadow detail in the final 16-bit HDR photo, preserving information in dark areas with slight compression of highlights.
Compression
- Standard: The most compatible compression method.
- JXL: Uses the JPEG XL algorithm (supported in DNG 1.7+). It preserves the full 16-bit data depth at a smaller file size while maintaining excellent quality.
Brackets save
When enabled, saves all individual exposures (brackets) used for an HDR merge. They are saved in order from longest to shortest exposure.
Save brackets to
Choose where to save your brackets files: the system Photos library or the Files App.
Brightest EV
This setting controls the brightest exposure (EV) in a HDR bracket sequence.
Auto degradation
If heavy ghosting is detected during an HDR merge, the App will automatically fall back to saving the best single 12EV exposure instead of a merged file.
12EV DR
Compression
- Standard: The default compression algorithm used by Apple.
- JXL: Uses the JPEG XL algorithm (supported in DNG 1.7+). It preserves the full 16-bit data depth at a smaller file size while maintaining excellent quality.
Exposure offset
Sets a default exposure bias to be applied automatically when in 12EV DR mode.
Enhance
Reduces noise in dark areas by capturing and stacking multiple 12EV frames.
Whitelevel fix
This option helps prevent pink or magenta highlights that can occur on some iPhone models.
Output
Save to
Choose where to save your DNG files: the system Photos library or the Files App.
!!! Important note when saving to the Files App: !!!
- All DNGs saved in the "On My iPhone/Camac/" folder will count towards the Camac App's storage size in your iPhone's settings.
- Deleting the Camac App will permanently delete this folder and all the DNG files inside it.
Embed preview
Embeds a small, film-like, uncalibrated preview image into the DNG file. By default, no preview is embedded to keep file sizes minimal.
Set neutral profile
Applies a neutral color profile to the DNG file. This can help RAW files, especially from older devices, appear more natural and less tinted in the iOS Photos app.
Prefix
Add a custom prefix to all output filenames for easier organization.
Capture
Mute
Disables the capture sound, even in regions where camera sounds cannot normally be disabled, such as Japan.
Capture on focus
Trigger the capture when the manual focus is finished.
Viewfinder hold
Choose the action that occurs when you long-press on the viewfinder.
No blackscreen
Disables the brief black screen effect that typically appears during image capture.
Timer pattern
Create custom automated shooting sequences using different lenses and delays.
EXAMPLES:
- To take a shot every 3 seconds with the main camera continuously, use the pattern: w3c1!
- To capture two shots—one with the main lens and one with the telephoto lens—each time you press capture, use: c1c2
PATTERN RULES:
c0: Ultra-wide camerac1: Wide (main) camerac2: Telephoto camerac9: The currently active camerawX: Wait for X seconds (e.g.,w3waits for 3 seconds).!: Add to the end of a pattern to make it loop continuously until you stop it.- Note: Switching between cameras takes 1 second to set up. The 'Stable Capture' feature is ignored when using a timer pattern.
Stable capture
When enabled, the photo is only taken once the phone's movement is minimal.
Live photo
When enabled, the app captures a Live Photo immediately followed by a RAW photo.
UI
Settings on left
Moves the Settings button to the left side of the main screen.
Toolbar size
Adjust the icon size for the toolbar on the viewfinder.